I have two big overarching goals for my students when it comes to math. When they leave my classroom by the end of the year, my hope is that they can:
1. Be Independent Problem Solvers
I want my students to be able to make sense of a problem and find a way to solve it. Not in a “wait for the teacher to show me and then get it correct” kind of way, but being able to use tools and strategies to figure out a pathway to a solution on their own.
2. Explain their Thinking
The word “explain” comes up a lot in math these days. Students need to be able to explicitly describe HOW they solved a problem, both verbally and in written form.
Two feats that are easier said than done, right? Teachers know that this doesn’t happen overnight. It is an undertaking that we work on all year long. That being said, I’d like to share with you some effective ways to set them off in the right direction from the get go.
At the beginning of the school year, we really take the time to focus specifically on math tools, and how to utilize them effectively. It has made a tremendous difference in the way my students approach problems and in the way they explain their thinking. Students are able to apply what they’ve learned through these exploratory, collaborative lessons throughout the rest of the school year.
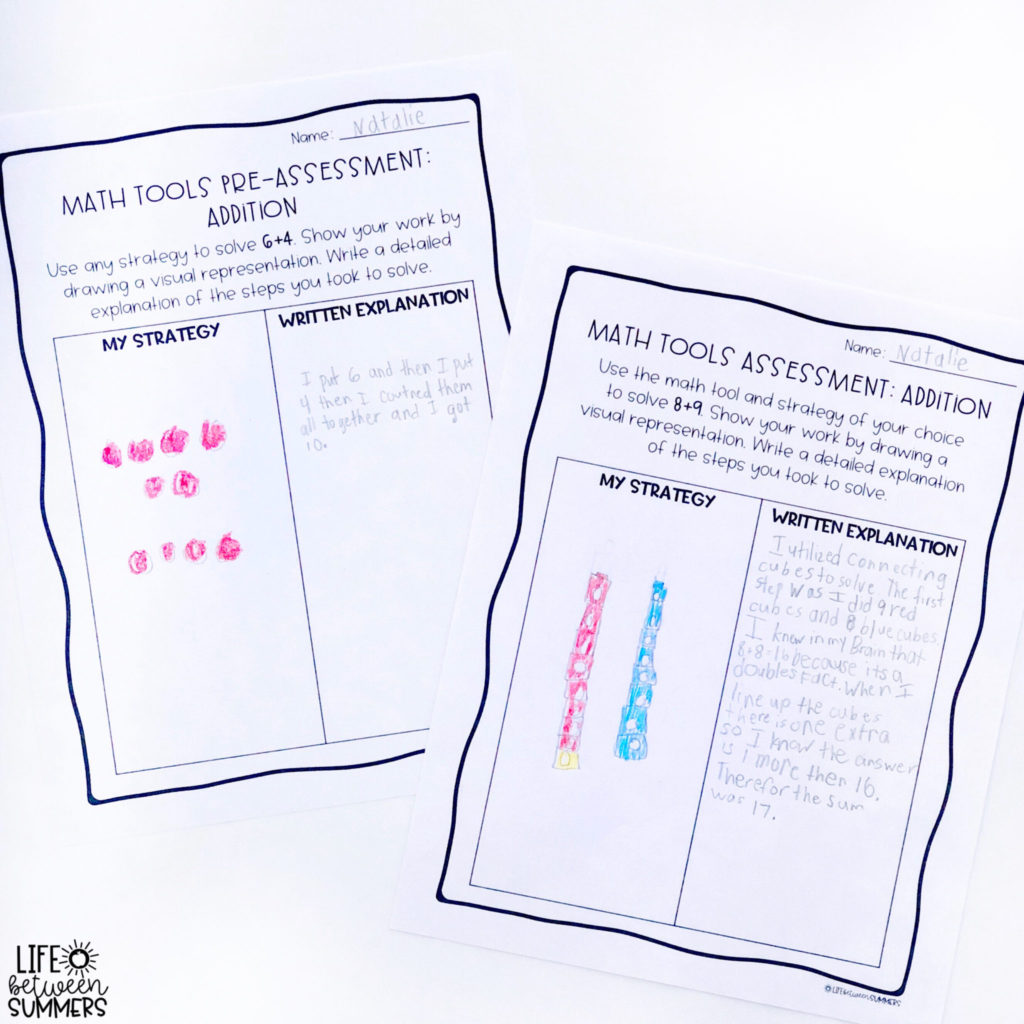
The first thing I do is give a pre-test to assess where the kids are at in terms of their ability to find a strategy to solve a problem and explain their thinking.
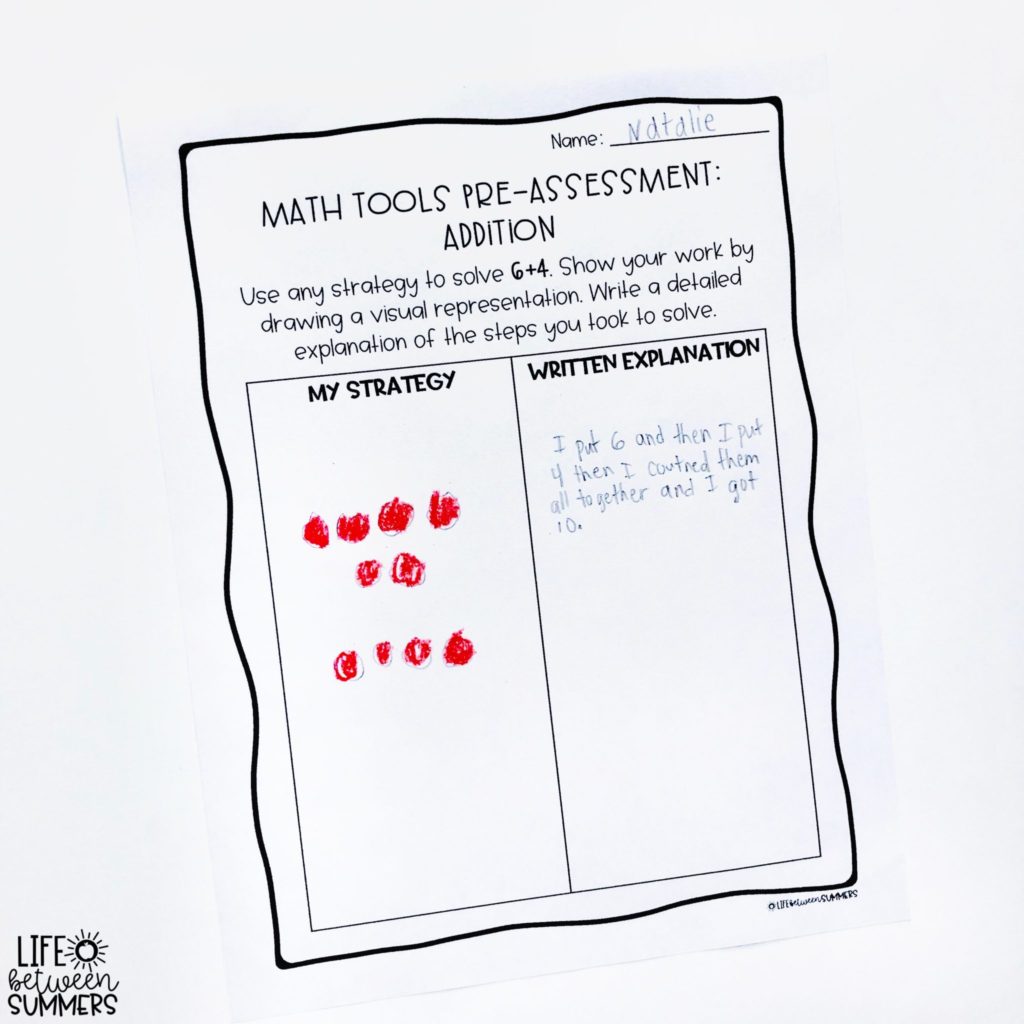
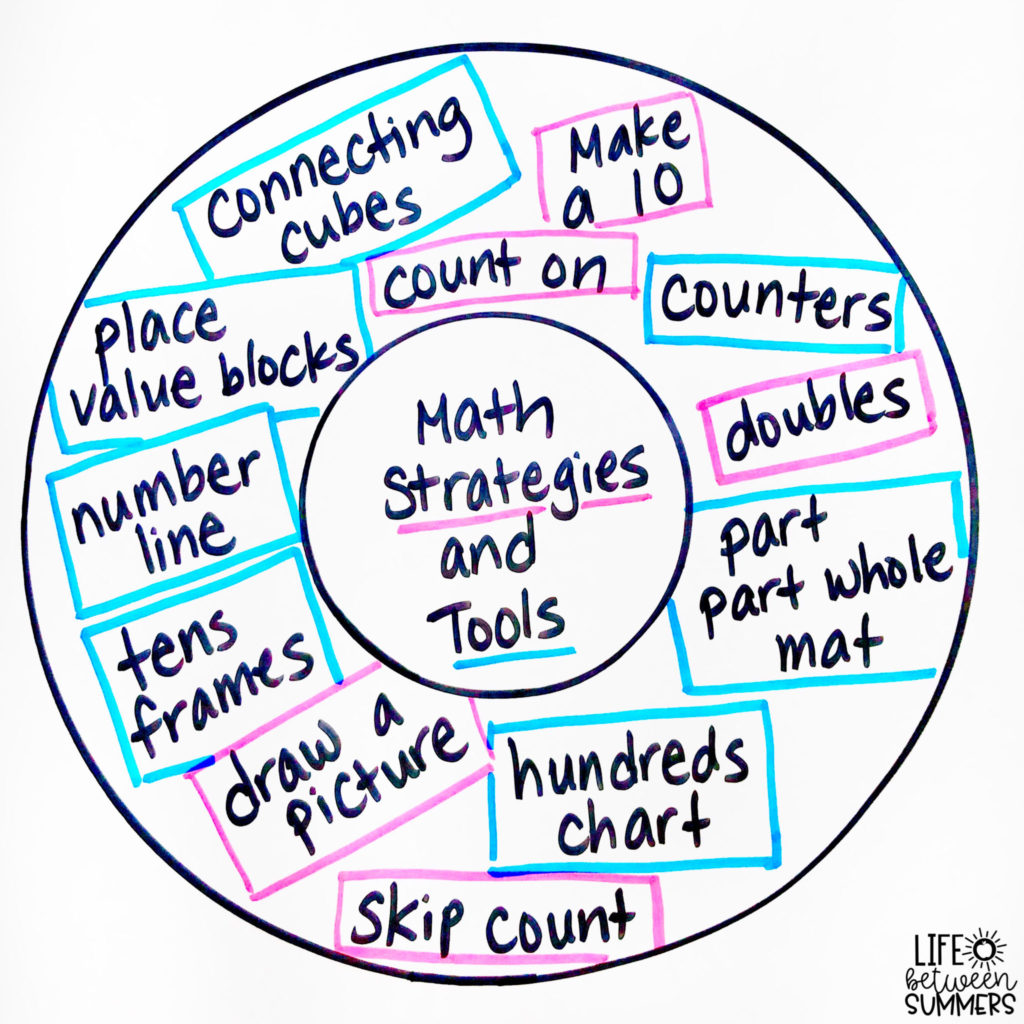
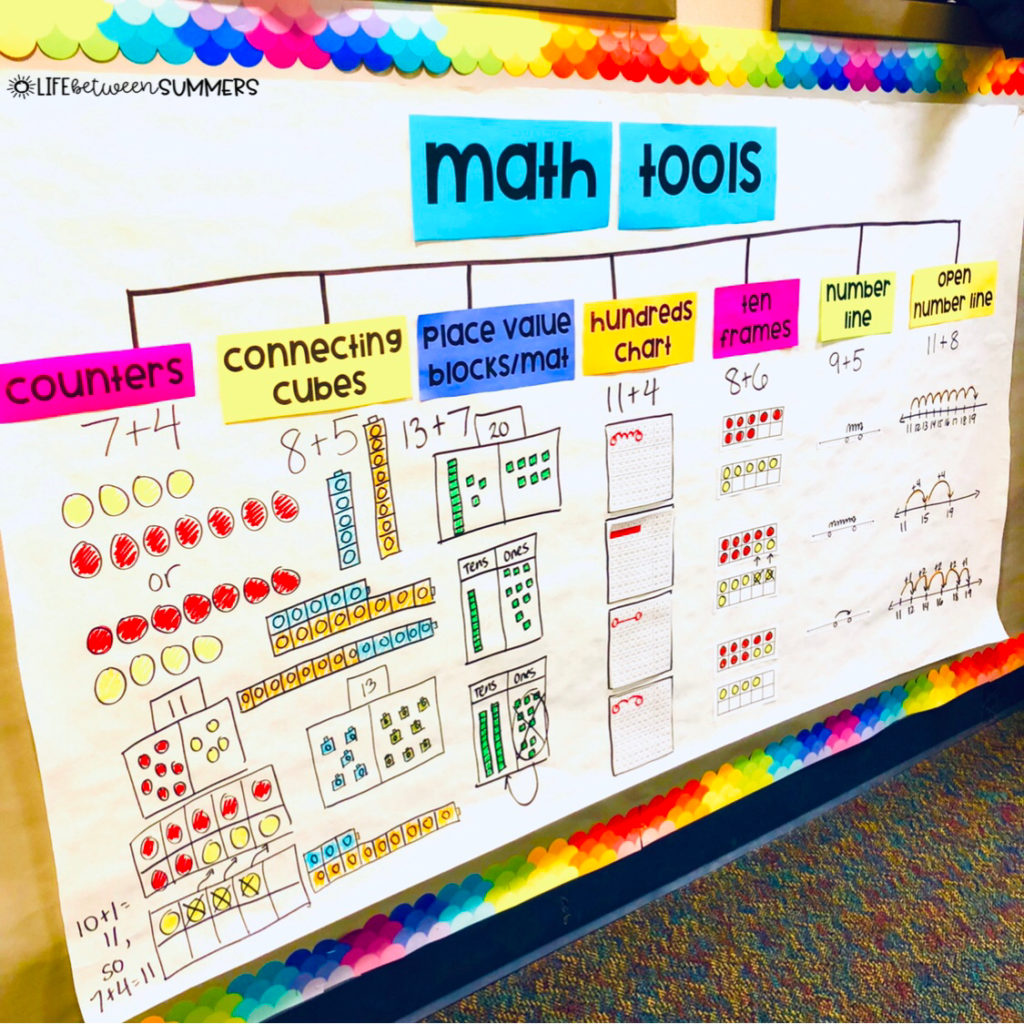
Levels will vary of course, but the pre-tests usually make it safe to say that in one way or another, every student has room for improvement. I start off by posing this question to the class during the first lesson: What are some strategies you can use to solve addition problems? I write their ideas in a circle map on chart paper (see below).
If/when a student brings up that tools are different than strategies during this brainstorm activity, I facilitate that discussion. And if no one brings it up, I go ahead and initiate the discussion. As a class, we define the difference between a tool and a strategy.
Strategy: a method, pathway, or approach used to figure out an answer to a problem
Tool: something you use to help you execute a strategy
I then have the kids work together to identify which ones on the circle map are tools and which ones are strategies. We color code the circle map to show the difference.
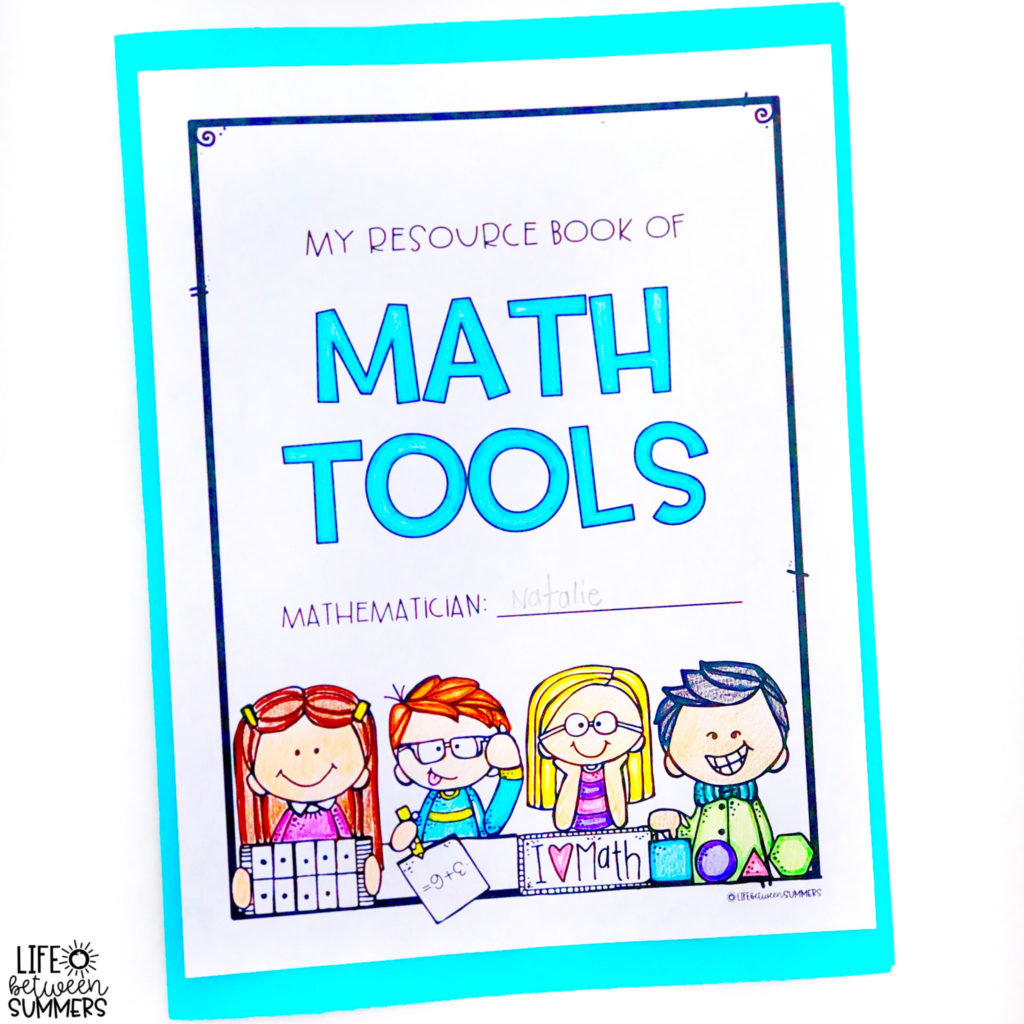
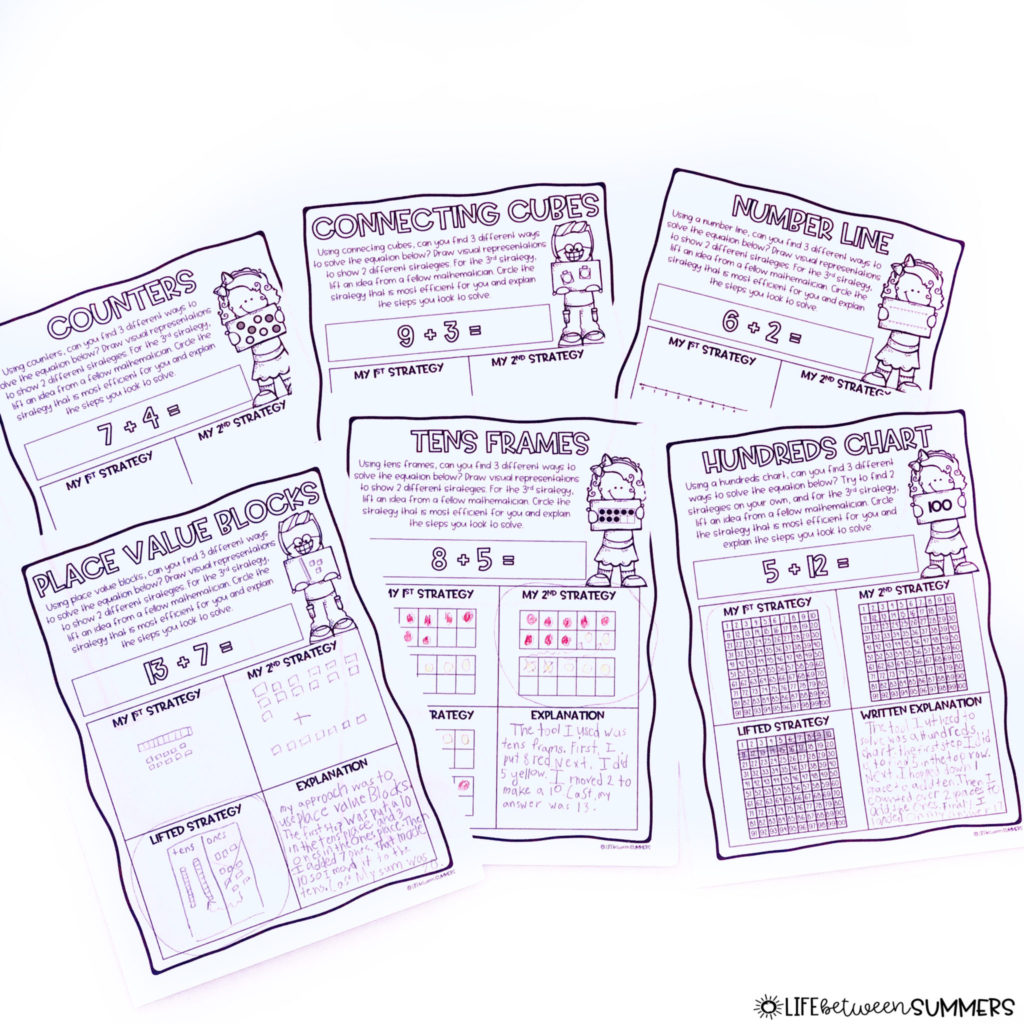
The following day, I present each of my mathematicians with their own Math Tools Resource Book.
Each day for the next week or so, we focus on a different math tool in our resource books. If it is a tactile tool, like counters or place value blocks, I give the kids a couple minutes to just play and explore with the manipulatives first. This is the time for them to get it out of their system, if you will. Giving them those couple minutes greatly minimizes the stacking, tower building, creating pretend light sabers out of connecting cubes, etc. during instructional time. The kids know that after I give a sound signal, the tools are only to be used for math and not for playing.
There is a designated page for each tool in their resource books. Here is the one for tens frames:
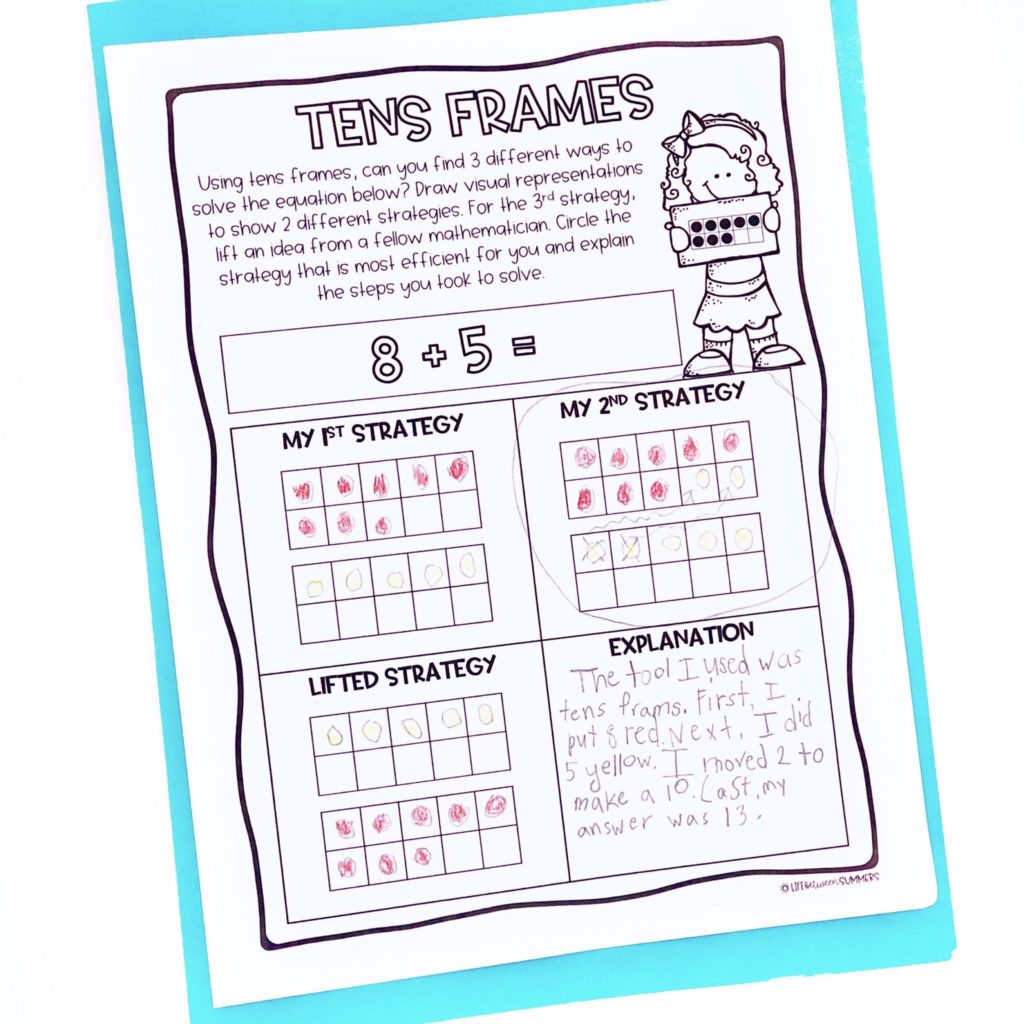
Students first try to come up with 2 different strategies to solve an addition (or subtraction) problem using tens frames. This is an exploratory time when they are coming up with strategies completely on their own. I do not give them any ideas or tell them how to solve, but instead tell them that I’m just wanting to see what they can try to come up with by themselves. We establish a growth mindset culture from the beginning of the year, so the kids know that it’s okay if they make a mistake or don’t know how to do it YET, as long as they are trying their best.
If students are only able to think of one strategy, that is okay. They can add more strategies to their page during the “lift” phase. After they’ve tried to find 2 different ways to solve on their own, they collaborate with and lift ideas from their peers. Since they will be collaborating multiple times for all of the different tools, I like to mix it up a bit each time. Here are some of the various ways I have kids lift ideas from each other:
Mix Pair Share
Kids walk around the room and find a partner. They show each other their strategies, and if their partner has a strategy that is different than theirs, they can choose to replicate/write it in that third box. They can move on to different partners if someone happens to have the same strategies as them.
Gallery Walk
Everyone leaves their resource books open out on their desks. Students can walk around the room and look at all of their peers’ work. They find an idea that they hadn’t thought of themselves and then add it to their own book.
Round Robin
Kids are put in small groups of 4-6. They go around the circle and share their ideas. After listening to all of the strategies, they can choose one to write down on their own page.
Spotlight Students
Choose several students to come up in front of the class one at a time to share their strategies. They can show them on the white board, or under a document camera if you have one. The rest of the class can write down a strategy that’s different from their own in their books.
After the lifting is completed, students have now been exposed to multiple strategies to solve the problem using that particular tool, 3 of which are recorded in their resource book.
Next, I have the kids evaluate all 3 of them and circle the strategy that they think is the best one. Before they choose, we have a discussion about what might help them determine which one is best (for example, they might ask themselves: Does it make sense? Is it efficient? Does it help me get the correct answer?) This may take some thinking aloud and modeling at first, but after repeating this with a couple of tools, they catch on pretty quick.
For whichever strategy they circled, I tell them that they will be writing sentences to explain HOW they used this strategy to solve the problem.
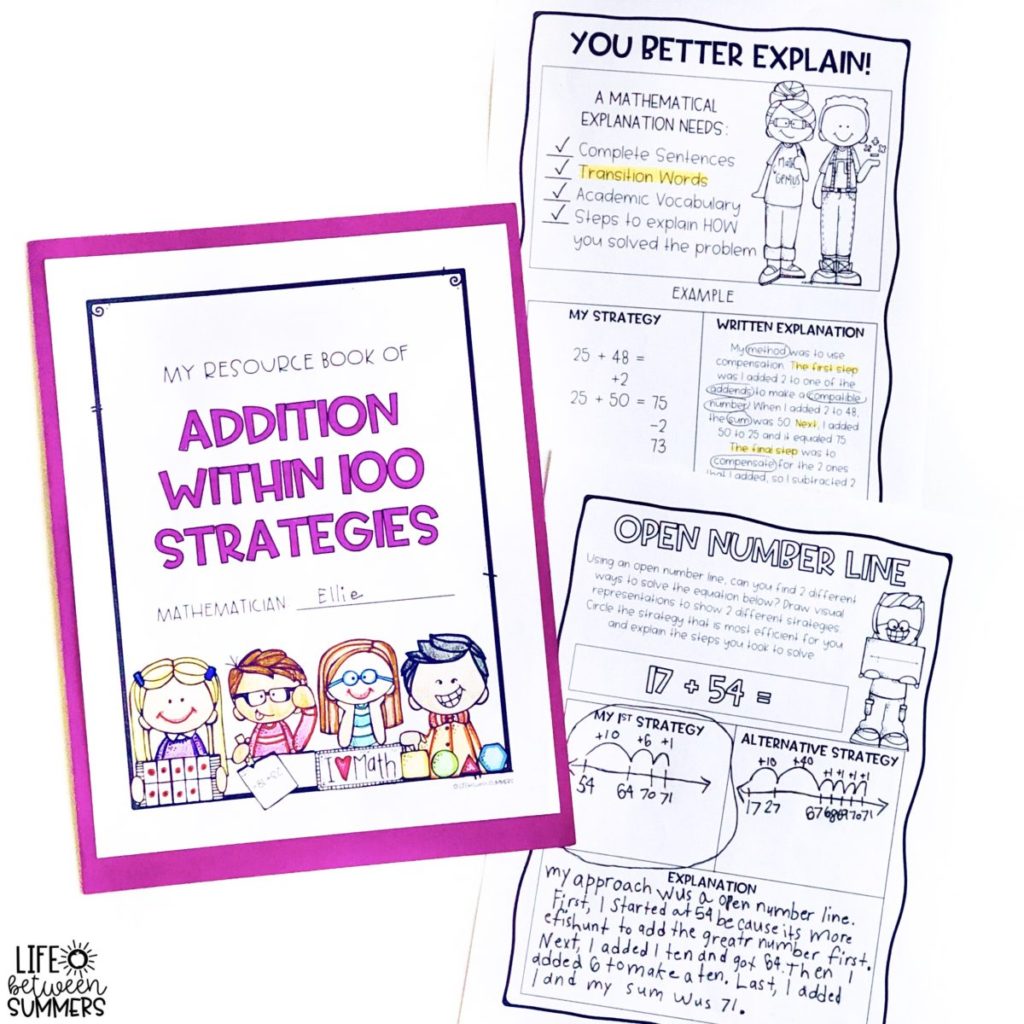
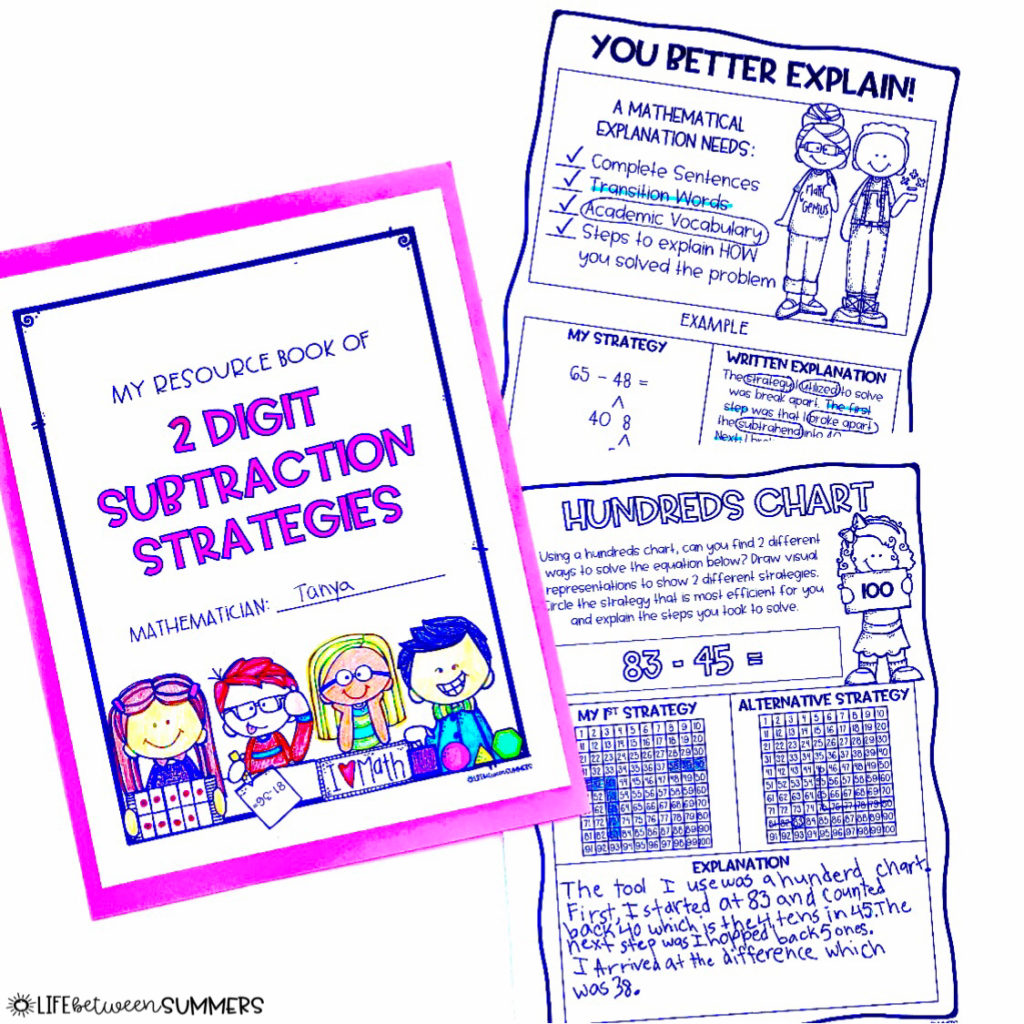
This is when I introduce the “You Better Explain!” page in their Resource Books.
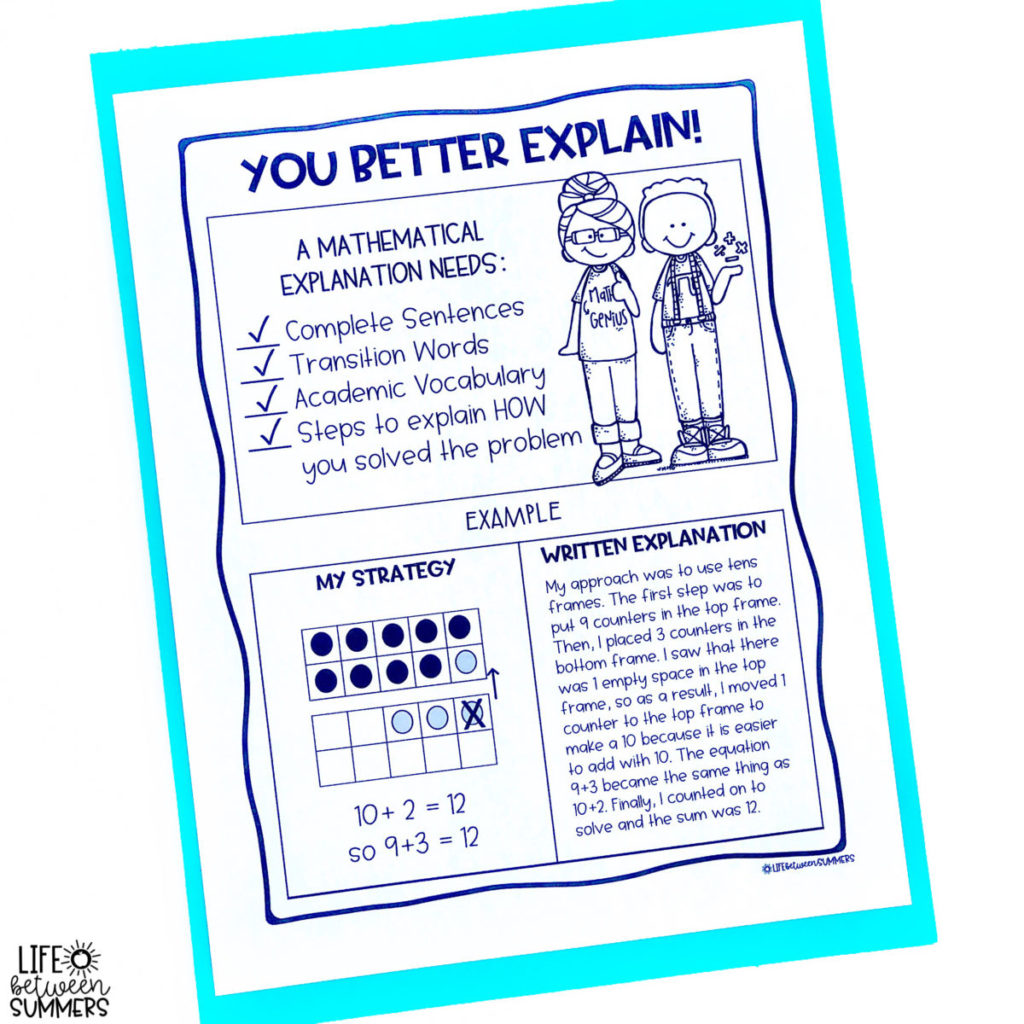
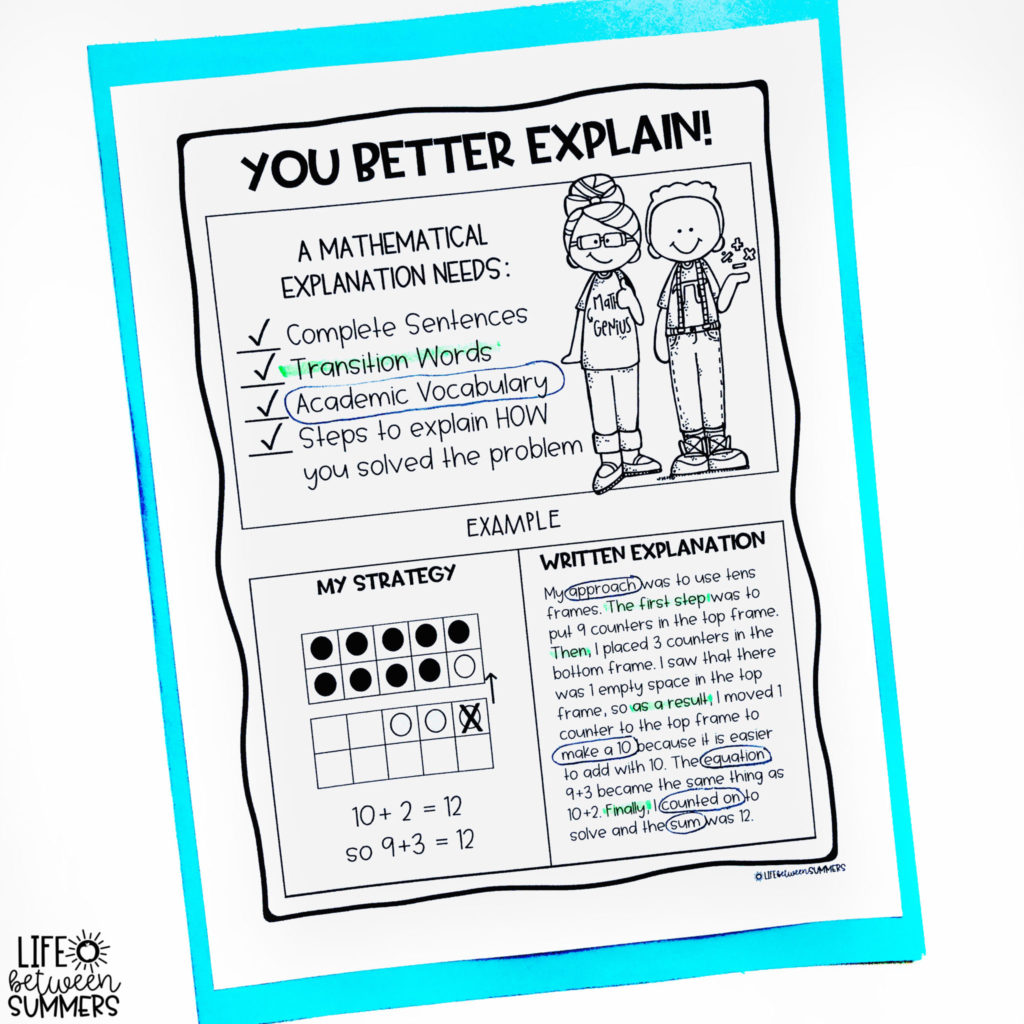
We go over the checklist of what their explanation should have, and discuss each in detail. We also take a close look at the provided example of a written explanation and analyze it. The class has a whole group discussion about the way it explains HOW the problem was solved step-by-step in complete sentences. I also have students search for and highlight/circle the transition words and academic vocabulary.
There is also a visual reference in their resource books for sentence starters, transition words, and academic vocabulary.
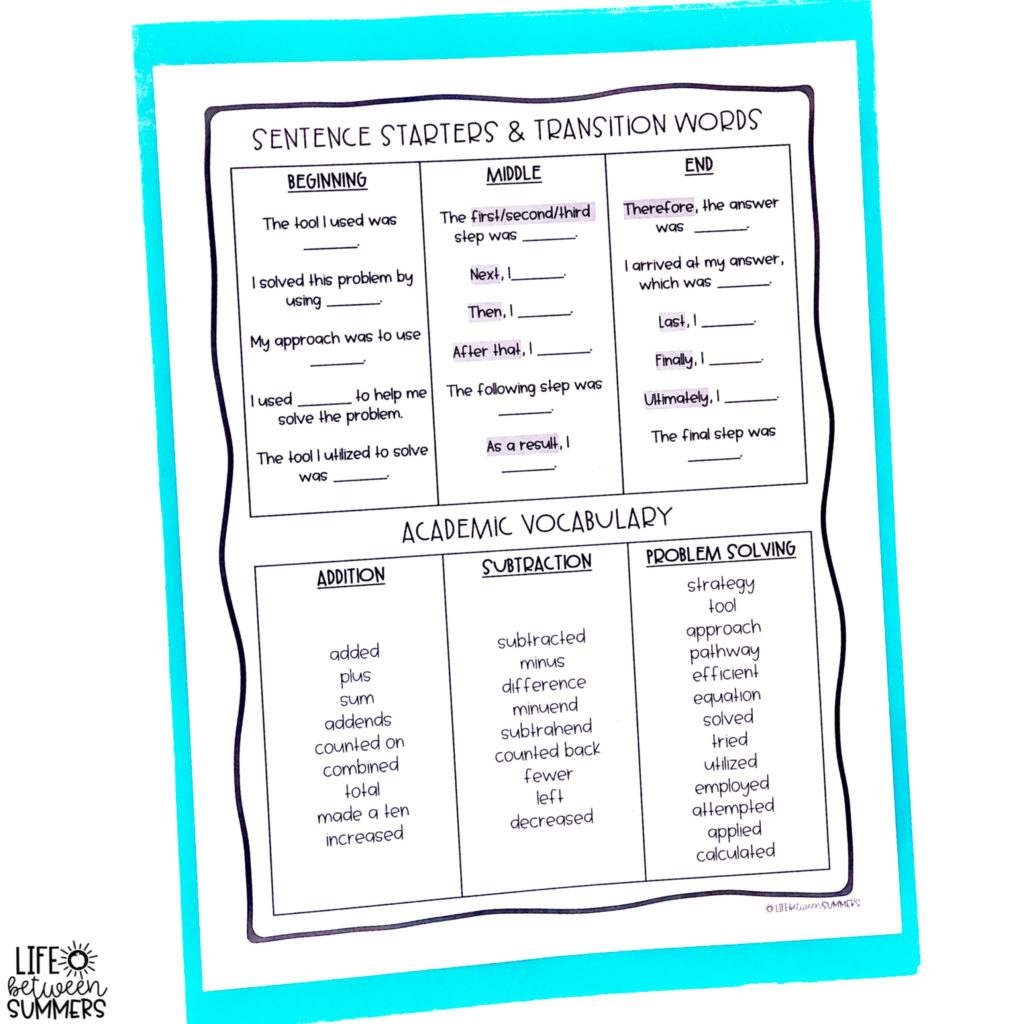
A blank template for this same page is included in their books so that the kids can brainstorm their own additional words as a class and keep adding to it as they come across new ones.
It is likely that you will have students who will need extra support with this type of writing in math. I provide those kids with these simpler sentence frames to help scaffold.
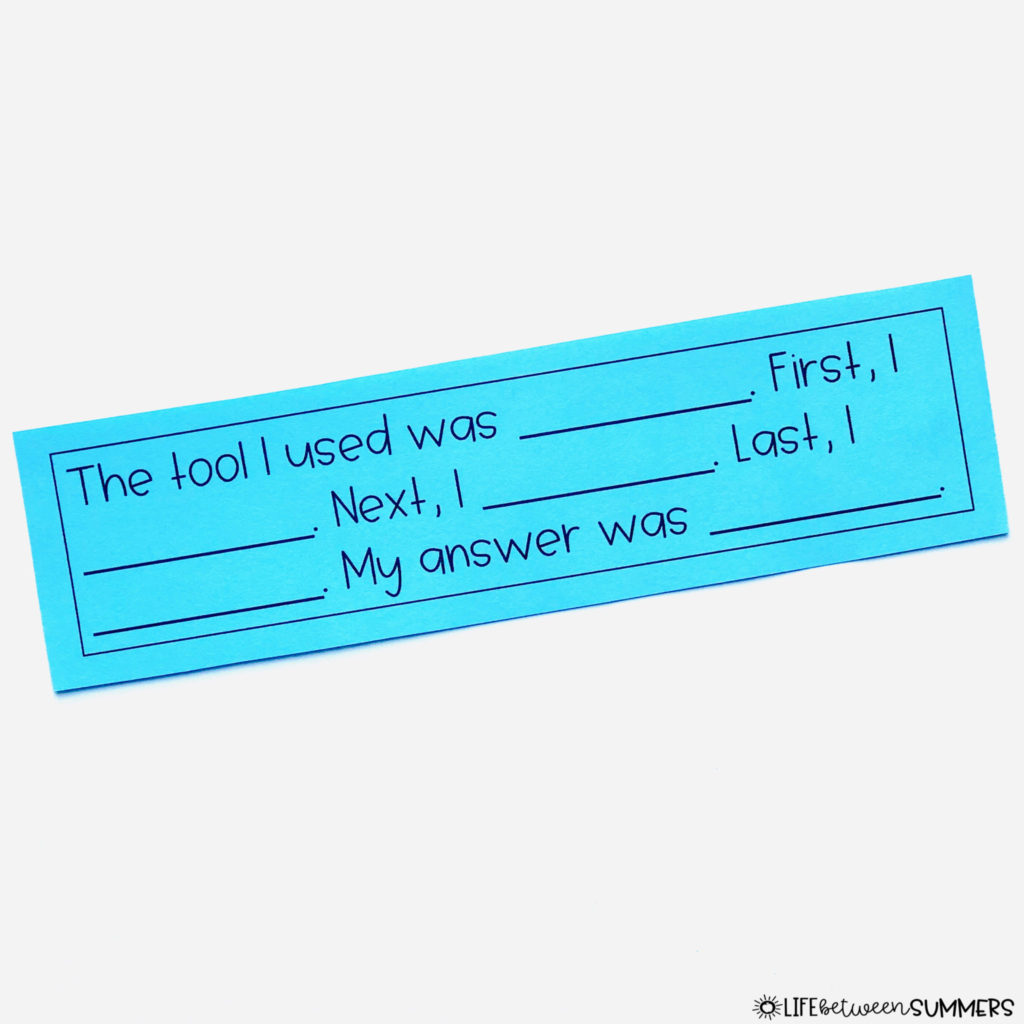
It allows them to have a structure to list the steps that they took to solve, and as they continue to practice, the goal is that they can progress to using other sentence starters and frames like those shown in the resource book. I laminate the strip and they keep it in their math folders to be able to take it out when they need help with forming their sentences. I tell the students that just like they use tools for math, they can use tools like this to help with writing too!
We repeat this same process of finding 2 different strategies, lifting ideas, and writing explanations for all of the math tools included in the resource book:
Counters
Connecting Cubes
Number Line
Open Number Line
Tens Frames
Place Value Blocks
Hundreds Chart
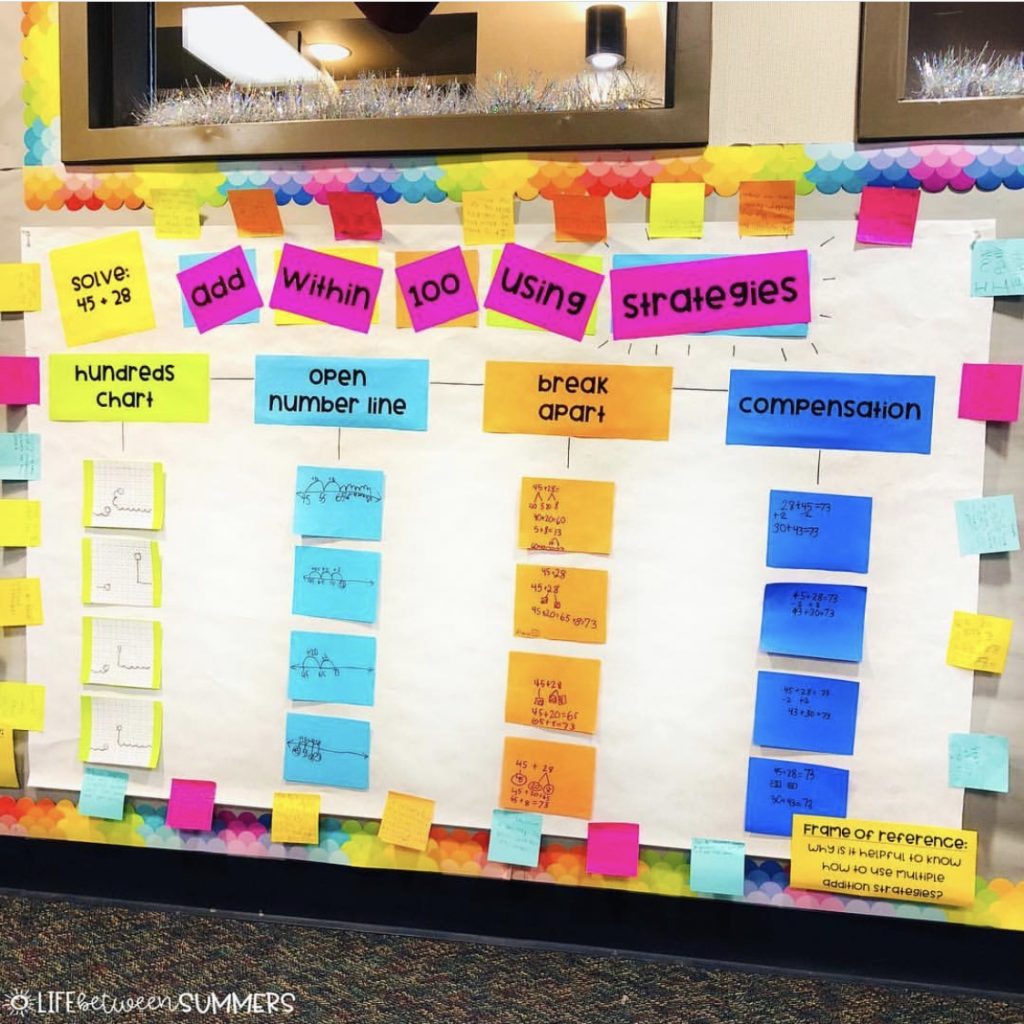
All the while, we continue to review the writing explanation process and switch up the lift activities to keep it fresh. Each time we finish practicing a new math tool in our resource books, I have students share their best strategies with the entire class and they get recorded on a tree map. This gets displayed in the classroom as a useful visual. The kids refer to it all the time during math!
As a closing to these lessons, I have students flip back through their books and review all of the tools and strategies they have used. I give each student a sticky note and ask the question: How does using tools support us as mathematicians? The kids reflect and write a response on their sticky note, and we have a discussion where they share their thoughts. The sticky notes can be placed on a chart, in their Resource Books, or stuck around the edge/border of the tree map.
At the very end, students are given a post assessment (I also have individual assessments for each specific math tool if needed). I compare this assessment to the pre-test that they took at the beginning, and the growth is often significant.
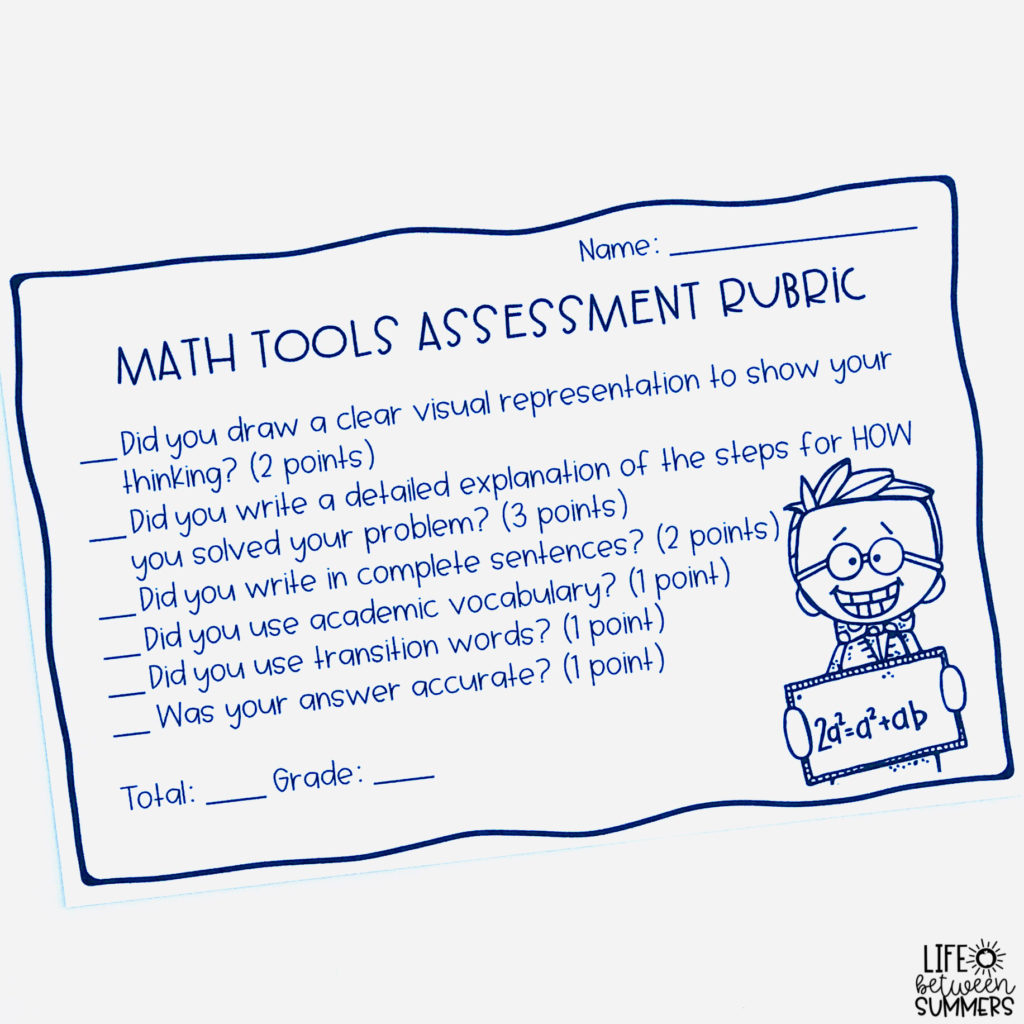
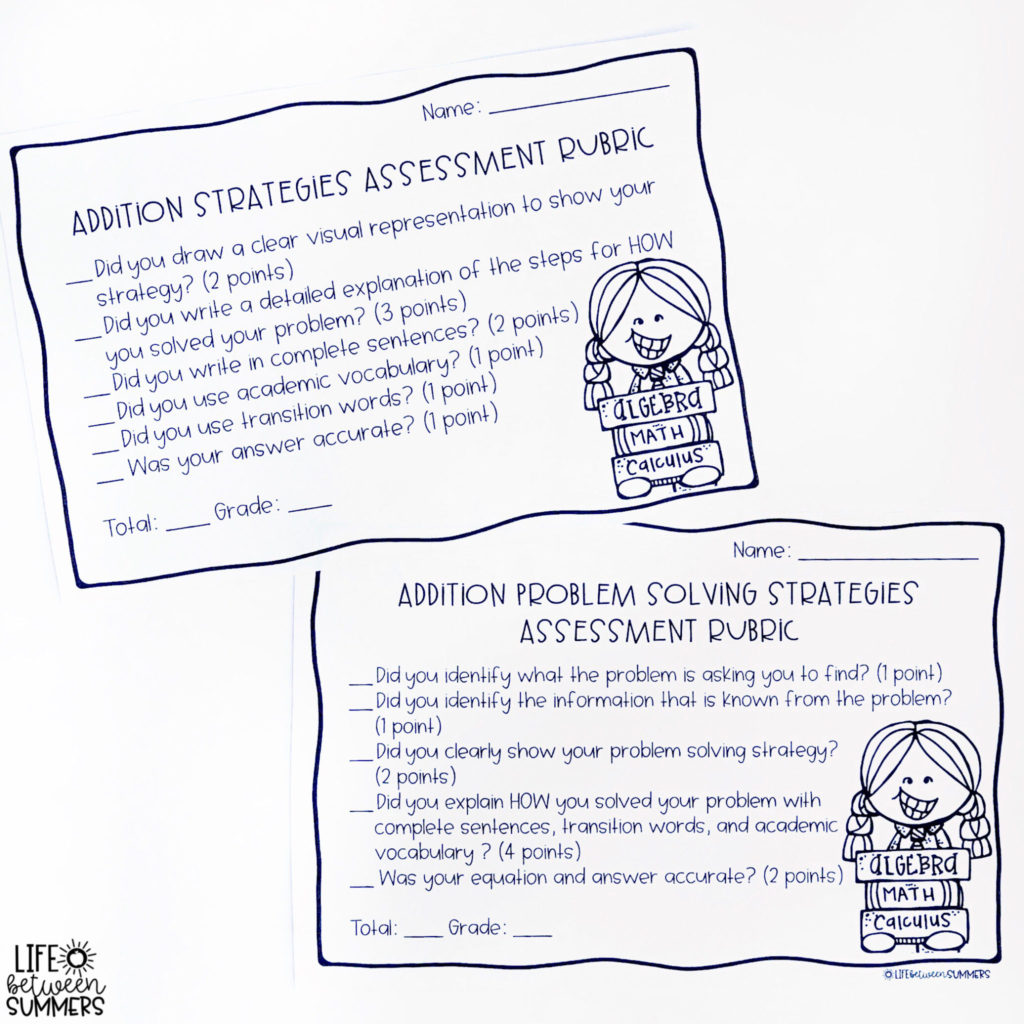
I use this rubric to grade the post-assessment:
After all is said and done, I have students continue to keep their resource books in their desks or in a spot that is easily accessible. I tell them that if they ever forget how to use a specific math tool or need help thinking of a strategy to solve a problem during math, they can always go look back in their resource books.
If you’d like to give this a go with your own class, the entire resource can be downloaded either here in my online store or on Teachers Pay Teachers. It includes the following for both addition and subtraction:
- Lesson Plans
- Math Tools Resource Book cover & explore pages
- Pre-Assessments
- Post-Assessments
- Grading Rubrics for Pre and Post Assessments
- Title and Headings for Tree Map Chart
- “You Better Explain” checklist & example
- Sentence Starter Frames
- Academic Vocabulary Word Bank
- Blank template for Sentence Starters & Academic Vocabulary
- Additional Simple Sentence Frames
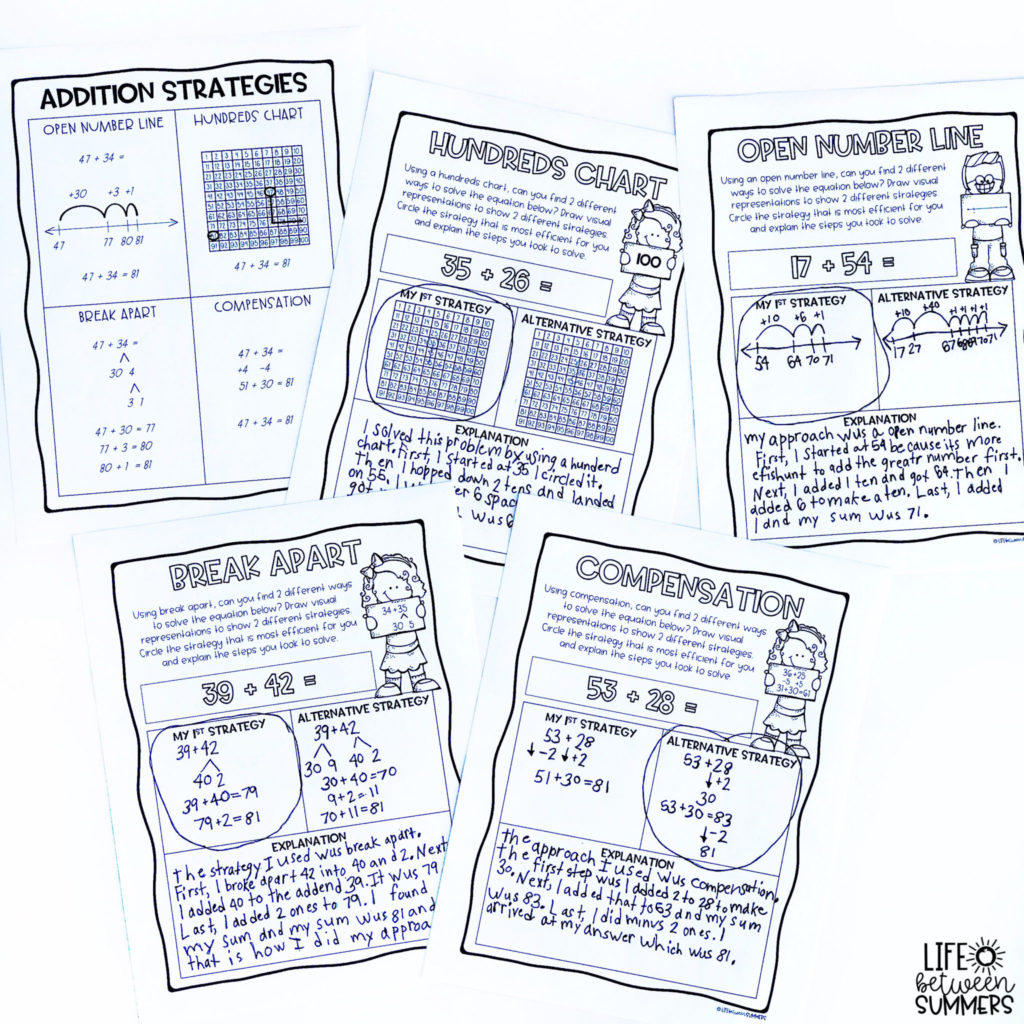
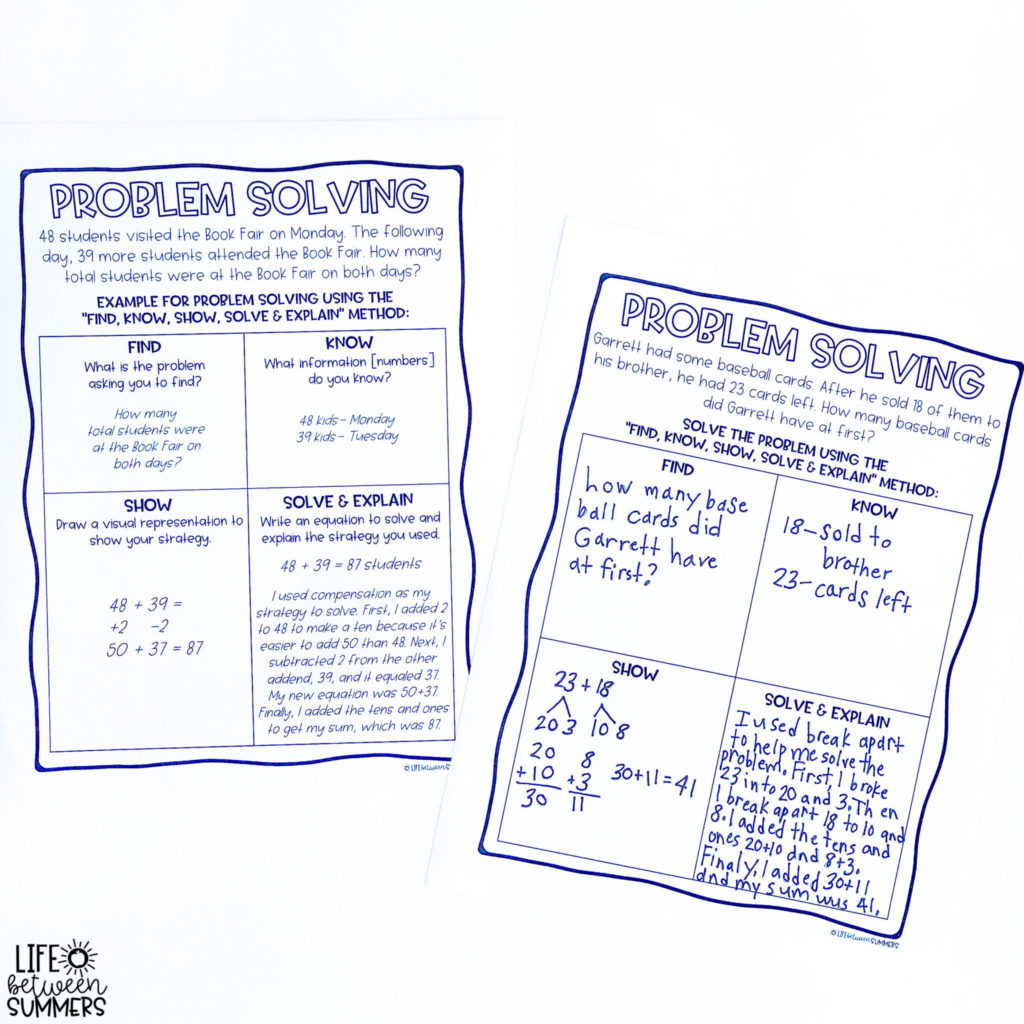
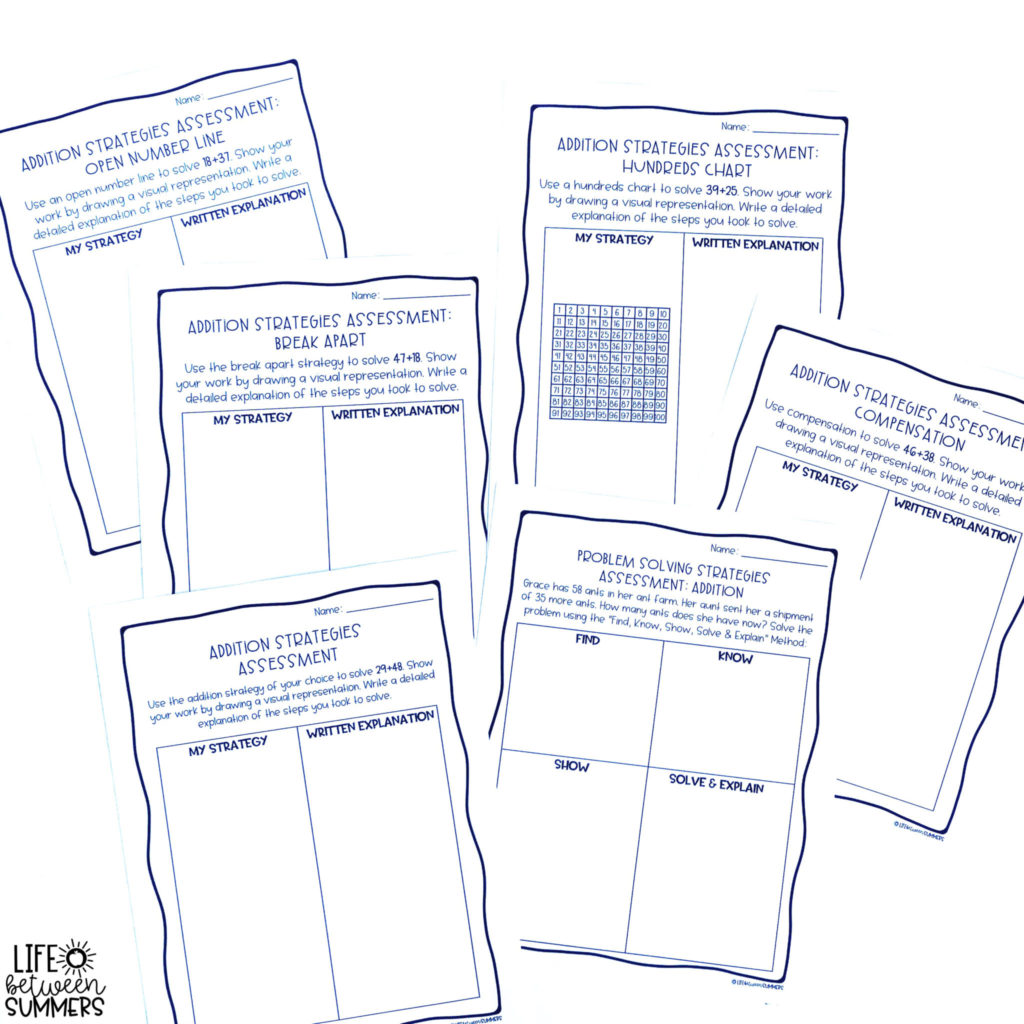
If you are further into the school year or want to build upon the math tools lessons, I also have brand new resource books for Addition Strategies Within 100 and Subtraction Strategies Within 100 (2 digit addition and subtraction). In a similar format to the Math Tools Resource Book, students practice solving problems using an open number line, hundreds chart, break apart, and compensation. If you have additional strategies that you teach your students, there is a page with a blank space for the title/heading so you can include those as well.
The resource also includes pages for practice with making sense of word problems and using strategies to solve them.
And similarly to the Math Tools resource, these versions also come with pre-tests, assessments, and rubrics.
If you are interested in using all 3 of the resources mentioned, make sure to check out the bundle for a discounted price. This same bundle is also on TPT.
From my own experience, when you set the bar high, kids will rise to the occasion. These particular lessons and activities give them the opportunity to do that. I’ve found that taking the time to focus on these skills and strategies really builds a solid foundation for problem solving and explanatory writing. Early on, kids get the tools (literally!) that help them to be successful in math.